
Learning how to take sweet pea cuttings is a practical skill for UK gardeners who want to multiply specific named varieties with exceptional scent, colour, or performance. While sweet peas are usually grown from seed, cuttings let you create identical clones of a favourite cultivar. This method works especially well for perennial sweet peas and strongly scented hybrids. This comprehensive beginner-friendly guide focuses on the easiest method (water propagation) while covering all options.


Why Take Sweet Pea Cuttings?
- True-to-type plants: Cuttings produce exact clones with the same flower colour, scent, and growth habit.
- Preserve special varieties: Ideal for rare, heirloom, or high-performing cultivars.
- Faster flowering: Cuttings can give you plants that flower earlier than seed-raised ones.
- Cost-effective: Multiply expensive varieties for free.
Best Time to Take Sweet Pea Cuttings in the UK
- Optimal window: Early to mid-summer (June – July).
- Secondary window: Late summer (August – early September) for overwintering young plants.
How to Take Sweet Pea Cuttings
Water propagation is the easiest and most successful method for sweet peas, especially for beginners. It is fast, visual, and requires minimal equipment.
What You Need
- Jar of water
- Scissors
- Sweet pea seedlings
- Root hormone (amazon link – opens in a new tab)
Step One – Choose the Parent Plant
Select a healthy, vigorous sweet pea with strong growth and good scent. The best cuttings come from non-flowering side shoots on robust plants.

Step Two – Select and Cut the Stem
Choose healthy, non-flowering side shoots 8–12 cm (3–5 inches) long.
- Cut just below a node at a 45° angle.
- Make a straight cut at the top just above a node.
Step Three – Prepare the Cutting
Remove the lower leaves, leaving 3–4 leaves at the top. If leaves are large, cut them in half to reduce water loss.
Optionally dip the base in rooting hormone (helps but not essential for sweet peas).
Step Four – Root the Cutting in Water
- Place the cuttings in a clean glass jar or vase filled with room-temperature water.
- Ensure the bottom 4–5 cm of the stem is submerged, but the leaves stay above water.
- Position the jar on a bright windowsill with indirect light (avoid strong direct sun).
Step Five – Maintain the Cuttings
- Change the water every 2–3 days to keep it fresh and prevent bacterial growth.
- Rinse the stems gently when changing the water.
- Rinse the stems gently when changing the water.
- Roots usually begin to appear in 10–14 days and are ready for potting when they reach 3–5 cm long.

Step Six – Pot Up the Rooted Cuttings
Once roots are well developed, gently plant them into small toilet rolls filled with moist, well-draining peat-free compost mixed with perlite.
Keep them in high humidity (plastic bag or propagator) for the first 7–10 days to help them adjust from water to soil.
Step Seven – Harden Off and Plant Out
Gradually acclimatise the young plants to outdoor conditions over 7–10 days. Plant out after the last frost (late May to early June) in a sunny, sheltered spot with rich soil and strong supports.
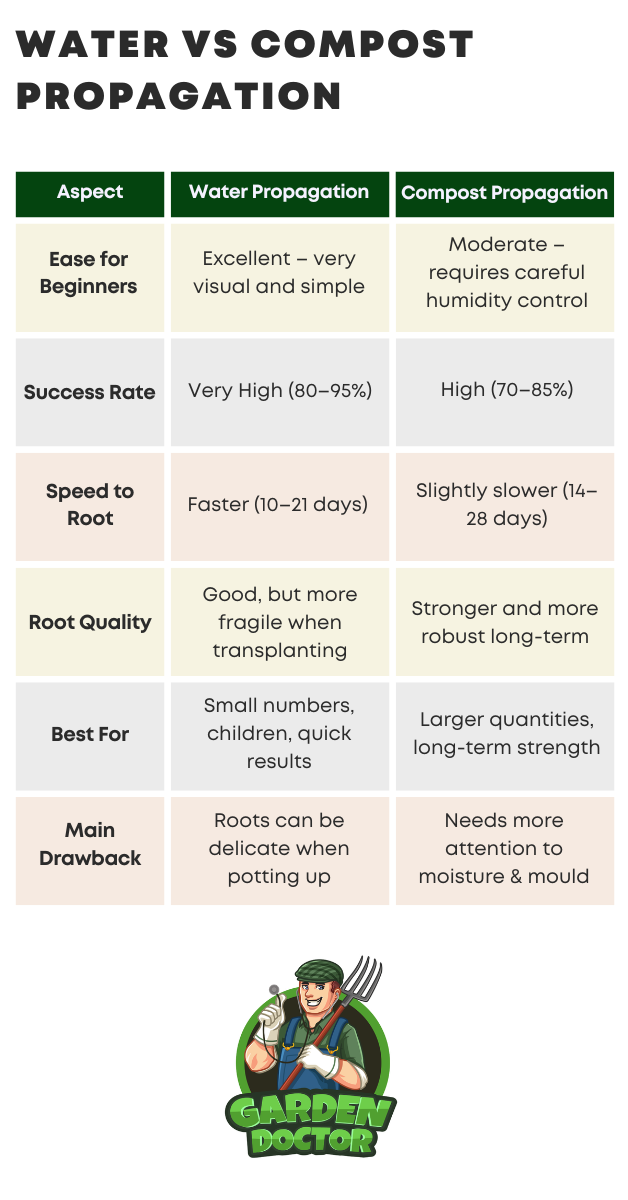
Water vs Compost Propagation
Water Propagation (Best for Beginners):
- Very easy and visual — perfect for seeing roots develop.
- High success rate with sweet peas.
- Minimal equipment needed.
- Ideal for small numbers of cuttings.
Compost Propagation:
- Produces slightly stronger, more robust roots long-term.
- Requires more attention to humidity and airflow.
- Better if you are propagating larger quantities.
- Use a 50/50 peat-free compost and perlite mix.
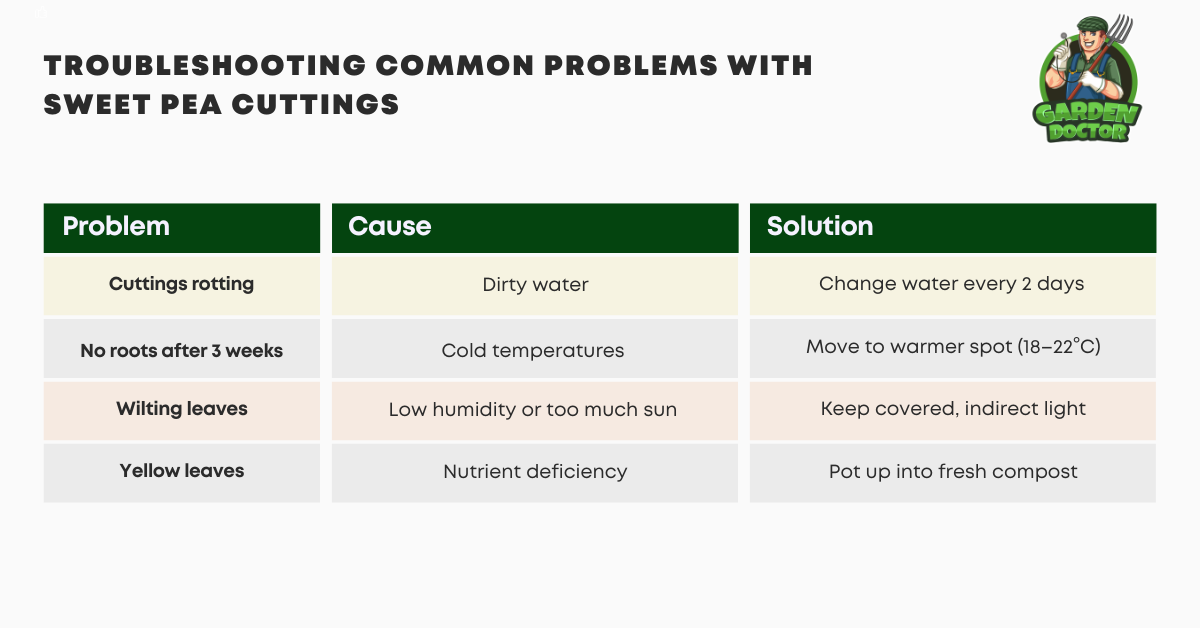
Troubleshooting Common Problems
When Can I Plant My Sweet Pea Cuttings Outside?
Safest planting time: After the last frost has passed — late May to early June in most of the UK.
Regional Variations:
- Southern England & coastal areas: Mid-May onwards (milder conditions).
- Midlands & central UK: Late May to early June.
- Northern England, Wales, Scotland & higher ground: Early to mid-June.
Hardening Off (Essential 7–10 Days):
Gradually expose the young plants to outdoor conditions: start with a few hours in a sheltered spot, then increase time outdoors before final planting.
Final Planting Tips:
- Choose a sunny, sheltered position with rich, well-drained soil.
- Add plenty of well-rotted manure or compost.
- Space plants 20–30 cm apart.
- Provide strong supports (canes, netting, or obelisks) from day one.
- Water consistently, especially during dry spells.
Conclusion
Sweet peas are a garden favourite and taking cuttings from them to grow new plants is extremely easy. You don’t need any special equipment and in as little as six weeks, you could have a crop of brand-new sweet peas that are ready to be planted. Don’t forget that sweet peas have extremely long roots and we recommend planting them in toilet rolls.

Garden Doctor Tips
“Always take cuttings from non-flowering stems!”
“Pinch out growing tips after rooting to encourage bushy plants!”
“Overwinter young cuttings in a cold frame or greenhouse for earlier flowers next year!”
“Best varieties for cuttings: Perennial types and strongly scented Spencer hybrids!”
Frequently Asked Questions
How do you propagate sweet peas?
There are many ways to propagate sweet peas. One way is by seed, either fresh or harvested from the pods. Another method is by division, which can be done after flowering when the plants have “gone to sleep.” The third option for propagation is by taking cuttings.
Are sweet peas annuals or perennials?
Sweet peas can be either an annual or a perennial depending on the variety that you purchase. Some varieties will produce flowers for one season, while others will continue to grow through the winter and bloom again in the springtime.
When can sweet peas be planted outside?
-Plant between 15th April – 1st May
-The soil temperature needs to be above 16°C
-Sweet peas love sun exposure
Author
Trevor Wright is not just a seasoned horticulturist; he’s the esteemed Garden Doctor. With a BSc in Horticulture and years of hands-on experience in the soil, Trevor has become a trusted mentor for all things gardening. As the founder of Garden Doctor, he’s committed to clarifying the intricacies of gardening, offering straightforward advice that’s rooted in years of practice. His writing is a garden of how-tos, savvy insights, and comprehensive guides that enable individuals to nurture and grow their garden dreams. When he’s not knee-deep in garden beds, Trevor is at his keyboard passing on his green-thumbed wisdom to budding gardeners, ensuring that the legacy of sustainable and joyful gardening blossoms far and wide.


