
Propagating roses from cuttings is one of the most rewarding and cost-effective ways to expand your garden. In this comprehensive guide on how to take rose cuttings UK, we’ll cover everything from the best timing and techniques to potting mix recipes, troubleshooting, legal considerations, and long-term care. Whether you call it rose propagation UK, growing roses from cuttings, or softwood/hardwood rose cuttings, this method produces plants genetically identical to the parent — often without the suckering issues of grafted roses.
Roses root relatively easily compared to many shrubs, with success rates of 50-80% or higher when following best practices. You can create free plants for your own garden, share with friends, or preserve favourite varieties.


Why Propagate Roses from Cuttings?
- True-to-type plants: Cuttings grow on their own roots, avoiding rootstock suckers common in bought grafted roses.
- Cost savings: One healthy bush can yield dozens of new plants.
- Conservation and sharing: Preserve heirloom or sentimental varieties.
- Sustainability: Peat-free methods align with UK environmental goals.
Note on legality (Plant Breeders’ Rights – PBR): In the UK, you can propagate most roses for personal, non-commercial use. However, many modern varieties (especially from breeders like David Austin) are protected by PBR. It is illegal to propagate these for sale or commercial purposes without permission. Check labels or breeder info before sharing/selling. Older or species roses are generally unrestricted.
When is the Best Time to Take Rose Cuttings UK?
Timing is crucial due to the UK’s variable climate:
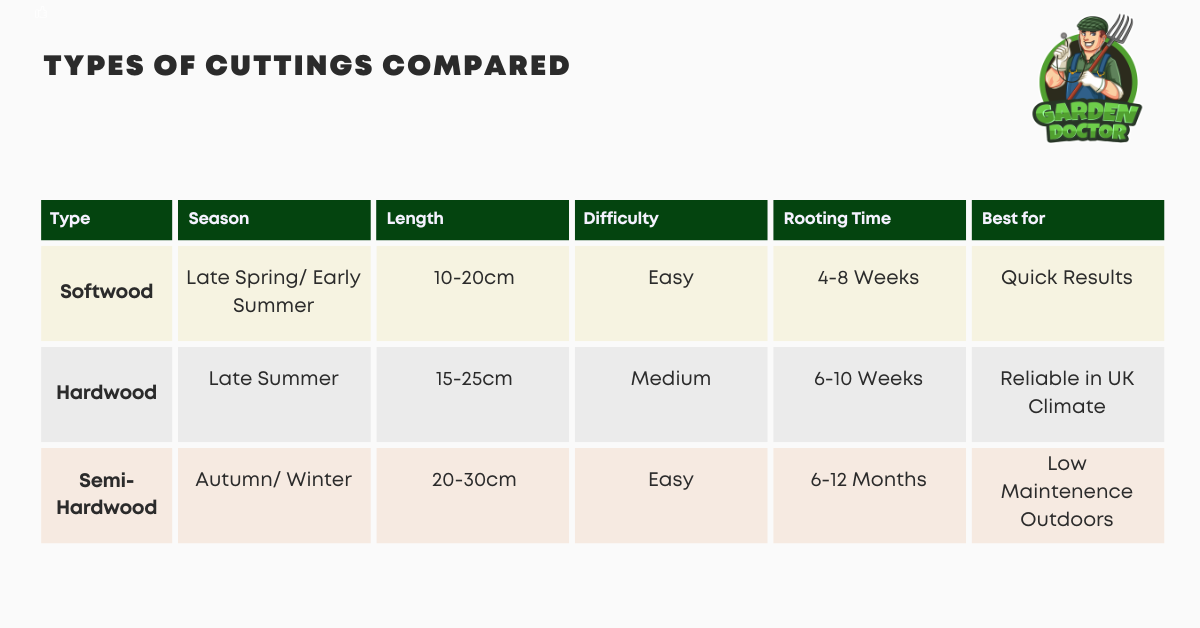
- Softwood cuttings (easiest and fastest): Late spring to early summer (May–July). New, flexible growth that snaps when bent. Roots in 4–8 weeks; can often plant out same year if started early.
- Semi-hardwood: Late summer (July–September). Firmer stems; good balance of speed and resilience.
- Hardwood cuttings: Autumn to winter (October–February). Pencil-thick, dormant stems. Slow to root (6–12 months) but very hardy; often planted directly outdoors in a trench. Ideal for low-effort propagation.
Early cuttings give the best chance of outdoor establishment before winter. Late ones need protection indoors or in a cold frame/greenhouse.
Is it Easy to Grow Rose from Cuttings in the UK?
Yes, it is relatively easy to grow roses from cuttings in the UK. Roses are one of the more forgiving shrubs to propagate, with success rates typically 50–80% (often higher for easy varieties like rugosas). Many gardeners, including beginners, succeed with basic care and no fancy equipment.
Why It’s Easy
- Multiple methods work well: Softwood (late spring/early summer) roots fastest (4–8 weeks), while hardwood (autumn/winter) is almost “stick and forget”.
- UK’s damp climate helps maintain the humidity cuttings need.
- You only need secateurs, pots, and a windowsill or cold frame.
Main Challenges
- Preventing rot from overwatering or poor drainage (the most common issue).
- Protecting late cuttings over winter.
- Some modern hybrids are slower than older varieties.
Top Tip for Success: Take several cuttings per plant, use a gritty peat-free mix, keep them moist but not soggy under a plastic bag or propagator, and be patient.
How to Take Rose Cuttings?
The job of taking Rose cuttings is not too difficult but there are a few things that you will need to consider in order to ensure the best chance of success.
There are also a few things that you will need that you may already have kicking about in your shed.
What You Need
- Sharp tool for cutting (knife, secateurs etc.) Ensure sterilised with rubbing alcohol
- Rooting hormone (amazon link – opens in a new tab) – powder or gel — optional but boosts success by 20–30%
- Peat-free, gritty potting mix (see recipe below).
- 9–10cm pots or deep modules.
- Clear polythene bags, propagator lids, or cut plastic bottles.
- Gardening gloves.
- Watering can with fine rose.
- Labels and pencil.
Recommended Potting Mix for Rose Cuttings UK (peat-free): 50% peat-free multi-purpose compost or John Innes Seed Compost + 50% perlite, horticultural grit, or sharp sand. This ensures excellent drainage and aeration to prevent rot while retaining moisture. Aim for pH 6.0–6.5. Pre-moisten before use.
Step 1 – Prepare Your Tools
Before you start taking any cuttings, it is important to make sure that you have the right tools for the job. Secateurs, scissors, and knives can all be used for taking cuttings, but you must ensure that they are clean and sharp.
It is also a good idea to put on your gardening gloves, I would always recommend this for all plants to prevent the sap from causing any irritation to the skin.
Step 2 – Choose the Parent Plant
Select a healthy, disease-free rose showing vigorous growth. Avoid stressed or flowering stems if possible (remove buds/flowers).
Step 3 – Select and Cut the Stem
Choose pencil-thick stems of this year’s growth. Cut 15–25cm lengths (longer for hardwood). Make a clean 45° cut just below a leaf node at the base and straight across above a node at the top. The angled base increases surface area for roots and prevents water pooling.
Note: Cutting at a 45° angle reduces the possibility of water build-up on the parent plant that can ultimately cause rotting.
Step 4 – Prepare the Cutting
Remove all but the top 1–2 leaf pairs (or one leaf for larger leaves to reduce transpiration). Optionally, “wound” the base by scraping a thin strip of bark to expose the cambium layer — this can encourage rooting.
Step 5 – Apply Rooting Hormone (Optional but Recommended)
Dip the base in hormone powder/gel. Shake off excess.
Step 6 – Plant the Cutting
Make a hole in the moist mix with a dibber. Insert the cutting so at least 2 nodes are buried. Firm gently. Label with variety and date.
Step 7 – Create Humidity
Cover with a clear polythene bag (with ventilation holes) or propagator lid. Avoid leaves touching the cover to prevent rot. Place in bright, indirect light (e.g., north-facing windowsill or shaded greenhouse). Bottom heat (18–22°C) speeds softwood rooting.
Note: Plastic grocery bags will usually have holes in but if you are using a sandwich bag or something similar, it is best to poke one or 2 small air holes for ventilation.
Step 8 – Water and Monitor
Keep the mix damp like a wrung-out sponge — never soggy. Mist leaves if humidity drops. Check weekly for fungal issues.
Step 9 – Rooting and Potting On
New growth or resistance when gently tugged indicates roots (usually 4–10 weeks). Pot on into individual pots with rose-friendly compost once rooted. Harden off gradually before planting out.
Water Propagation Alternative (Great for kids): Place cuttings in a jar of water on a bright windowsill. Change water regularly. Once roots form (2–6 weeks), pot up. Less reliable long-term but visually engaging.
Troubleshooting Common Problems with Rose Cuttings
Even with good technique, rose cuttings can sometimes struggle. Here are the most common issues and how to fix them:
- Cuttings rotting at the base: This is usually caused by poor drainage or overwatering. Switch to a much grittier compost mix (more perlite or horticultural grit) and water less frequently. Always ensure pots have good drainage holes.
- No roots forming after 8 weeks: Often due to using old wood, cold temperatures, or insufficient rooting hormone. Take fresher semi-ripe cuttings next time, provide gentle bottom heat (18–22°C), and always use rooting hormone.
- Cuttings wilting or drying out: Usually from low humidity or too much direct sunlight. Keep them covered with a plastic bag or propagator and move to bright, indirect light. Mist the leaves lightly if they start to droop.
- Black spots, mould or fungal growth: Common in humid conditions with poor airflow. Increase ventilation gradually, remove any affected cuttings immediately, and avoid overcrowding pots.
- Leaves turning yellow: This can indicate overwatering, nutrient deficiency, or too much sun. Check drainage first, then feed very lightly with a balanced liquid fertiliser once roots have formed.
Pro Tip: Always take more cuttings than you need (5–10 per variety). This way, even if some fail, you’ll still have plenty of successful plants.
When Can I Plant My Rose Cuttings Outside?
Plant out in spring after last frost, in well-drained, fertile soil enriched with compost. Space according to variety.
- Keep in a sheltered spot or cold frame over winter.
- Mulch and water well in the first year. Expect flowers in year 2–3.
For hardwood trench method: Insert directly into a sheltered garden trench with sand at the base. Leave until next autumn.
Conclusion
Mastering how to take rose cuttings UK opens up endless possibilities for a beautiful, budget-friendly rose garden. With patience and attention to humidity, drainage, and timing, you’ll soon be propagating roses like a pro. Start with softwood in late spring for quickest results, or try hardwood in autumn for simplicity.

Garden Doctor Tips
“If you can, take multiple cuttings from multiple plants to increase chances of success!”
“If you want to involve the kids, pop your cuttings in water so you can see the roots as they grow!”
“Remember not to leave the cutting in direct sunlight as this can cause the leaves to burn and the cutting will be unlikely to survive!”
“When covering, ensure that your cuttings are not touching the plastic. Being in contact with the plastic when wet can lead to rotting and other problems!”
Frequently Asked Questions
Can I take rose cuttings in October?
Yes, you can successfully take rose cuttings in October in the UK. This is an ideal time for hardwood cuttings using mature, pencil-thick stems from this year’s growth. Cut 20–30 cm lengths just below a node at the base and straight across at the top, remove all but the top 1–2 leaves, and plant them into gritty, free-draining peat-free compost or directly into a sheltered garden trench with sand at the base. Place in a cold frame, unheated greenhouse, or protected spot outdoors. They will root slowly over winter and be ready for planting out the following autumn.
When to put rose cuttings outside?
You should put rose cuttings outside permanently in spring after the last frost (usually April–May in most of the UK), once they have developed a good root system and been hardened off for 1–2 weeks. For softwood or semi-hardwood cuttings taken earlier in the year, this can sometimes happen in late summer if well-rooted. Hardwood cuttings taken in autumn/winter are best left in their pots or trench until the following spring or autumn before final planting in well-drained garden soil.
How to take rose cuttings in September?
To take rose cuttings in September, choose healthy, semi-hardwood or early hardwood stems of this year’s growth. Select pencil-thick shoots, cut 15–25 cm lengths at a 45° angle just below a leaf node, remove the lower leaves leaving only 1–2 pairs at the top, optionally dip the base in rooting hormone, and insert into pots of gritty peat-free compost (50/50 compost and perlite/grit). Water well, cover with a ventilated polythene bag or propagator lid, and place in a bright, sheltered spot out of direct sun. Keep moist and protect over winter in a cold frame or greenhouse.
Is October too late to take cuttings?
No, October is not too late to take rose cuttings in the UK — it is actually one of the best months for hardwood propagation. The cooler weather reduces water loss and encourages strong root development over winter. Success rates are often high with this method as the cuttings are dormant and hardy. Just ensure you use strong, healthy stems, provide good drainage, and give winter protection. The plants will establish slowly and be ready for final garden planting next year.
Author
Trevor Wright is not just a seasoned horticulturist; he’s the esteemed Garden Doctor. With a BSc in Horticulture and years of hands-on experience in the soil, Trevor has become a trusted mentor for all things gardening. As the founder of Garden Doctor, he’s committed to clarifying the intricacies of gardening, offering straightforward advice that’s rooted in years of practice. His writing is a garden of how-tos, savvy insights, and comprehensive guides that enable individuals to nurture and grow their garden dreams. When he’s not knee-deep in garden beds, Trevor is at his keyboard passing on his green-thumbed wisdom to budding gardeners, ensuring that the legacy of sustainable and joyful gardening blossoms far and wide.


