
Learning how to air layer Japanese Maple (Acer) is one of the most reliable and successful ways to propagate these beautiful, sought-after trees in the UK. Air layering is significantly more effective than cuttings for Japanese Maples, with success rates often reaching 70–90% when done correctly. This method allows you to grow a rooted branch while it is still attached to the parent tree, producing a true-to-type plant with an established root system. This comprehensive, beginner-friendly guide covers everything you need — including UK-specific timing, materials, troubleshooting, and realistic expectations.

Why Air Layer Japanese Maples?
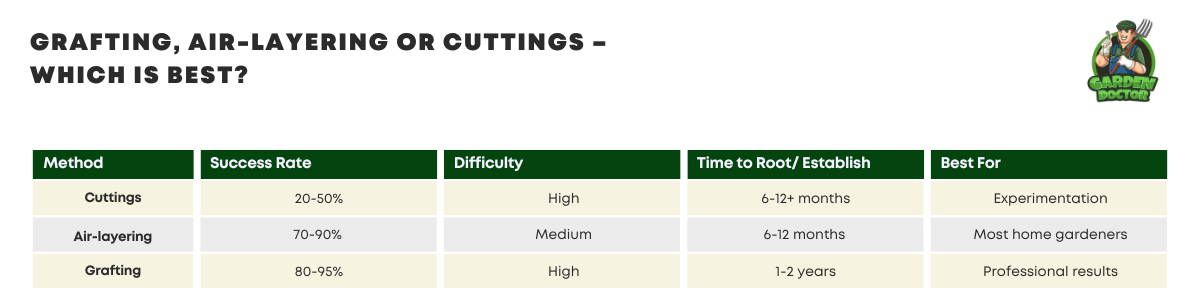
- Much higher success rate than cuttings (70–90% vs 20–50%).
- True-to-type plants with identical foliage colour, shape, and growth habit.
- Stronger start – The new plant already has a developed root system when separated.
- Preserve special varieties – Ideal for rare, expensive, or sentimental Japanese Maples.
- Control tree size – You can create a nicely branched specimen at the height you want.
Air layering is the preferred propagation method for most home gardeners wanting reliable results with Japanese Maples.
Best Time to Air Layer Japanese Maples in the UK
- Ideal window: Late spring to early summer (May – early July).
- Best period: May to mid-June, once the leaves have fully expanded and hardened off.
- The tree is actively growing and sending sugars downward, which encourages strong root formation at the air layer site.
Avoid late summer or autumn — roots may not develop sufficiently before winter.
Grafting, Air-Layering or Cuttings – Which is Best?
Air-layering is the most suitable way of propagating Japanese maple. Taking cuttings is interesting and can be fun but the success rate is very low.
How to Air Layer a Japanese Maple?
Air layering is widely considered the most reliable and successful way to propagate Japanese Maples (Acer) in the UK. Unlike cuttings, which can be slow and difficult, air layering allows you to grow roots on a branch while it is still attached to the parent tree. This results in a stronger, well-rooted plant with a much higher success rate (typically 70–90%). This beginner-friendly guide walks you through the entire process with clear, practical advice tailored to UK conditions.
What You Need
- Sharp tool for cutting (knife, secateurs etc.) Ensure sterilised with rubbing alcohol
- Rooting hormone (amazon link – opens in a new tab) – powder or gel — optional but boosts success by 20–30%
- Long-fibre sphagnum moss
- Clear plastic wrap or air-layering bags
- Aluminium foil
- Tie wraps, string, or grafting tape
- Optional but helpful: Air-layering pod (ready-made plastic container) and a small syringe for adding water.
- Pro Tip: Use rainwater for moistening the moss, as it is naturally slightly acidic and preferred by Japanese Maples.
Pro Tip: Use rainwater for moistening the moss, as it is naturally slightly acidic and preferred by Japanese Maples.
Step 1 – Choose the Branch
Select a healthy, straight branch 1–3 cm thick with good leaf growth. It should be in a position where the new tree will look balanced once removed. Younger branches (1–4 years old) root faster.
Step 2 – Prepare the Air Layer Site
Remove a 2.5–4 cm (1–1.5 inch) ring of bark completely (girdling).
Scrape away the green cambium layer underneath thoroughly — this prevents the bark from reconnecting and forces the tree to grow roots.
Apply rooting hormone gel or powder to the upper edge of the wound.
Step 3 – Apply the Rooting Medium
Wrap the wounded area with damp (not wet) long-fibre sphagnum moss. This is the gold standard medium — it holds moisture and provides aeration.
Alternatively, use a specialist air-layering pod or a mix of moist sphagnum and perlite.
Step 4 – Wrap and Secure
Cover the moss completely with clear plastic wrap or an air-layering bag.
Seal both ends tightly with ties or tape.
Wrap the outside with aluminium foil to protect from direct sun and regulate temperature.
Step 5 – Monitor and Maintain
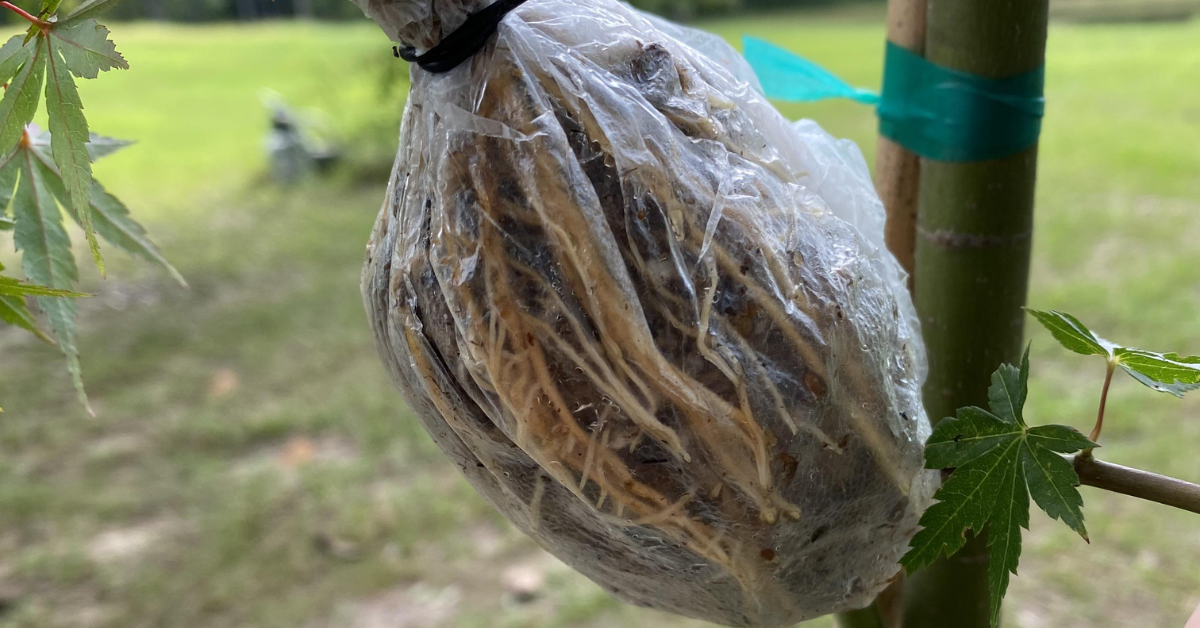
Check the moss every 2–4 weeks — it should stay moist. Add water with a syringe if it dries out.
Roots usually appear in 3–8 months (sometimes longer).
Step 6 – Sever and Pot Up
Once you see a good ball of healthy roots through the plastic, cut the branch below the air layer.
Remove the wrap, pot the new plant carefully into ericaceous compost + perlite, and keep it in high humidity for the first few weeks.
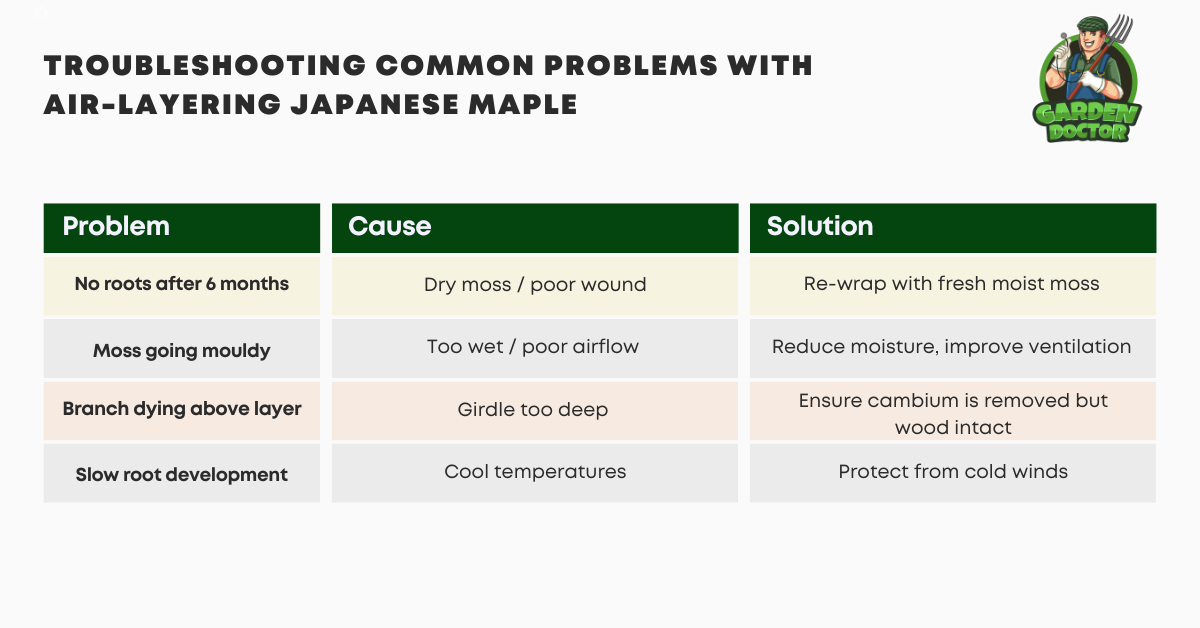
Troubleshooting Common Problems with Air-layering Japanese Maple
Aftercare for New Air Layers
- Keep in a sheltered, partially shaded spot for the first year.
- Use ericaceous compost and water with rainwater.
- Protect from strong winds and late frosts.
- Feed sparingly with an ericaceous fertiliser from the second spring.
Conclusion
Mastering how to air layer Japanese Maple gives you one of the most reliable ways to propagate these stunning trees in the UK. While it requires patience, the high success rate and strong rooted plants make it far superior to cuttings for most gardeners. Start in late spring for your best chance of success.

Garden Doctor Tips
“Use long-fibre sphagnum moss for best results!”
“Take multiple air layers on the same tree if possible!”
“Label clearly with date and variety!”
“Be patient — some layers take a full year!”
Frequently Asked Questions
When is the best time to air layer Japanese Maples?
May to mid-June, after leaves have hardened off.
How long does air layering take?
Usually 3–8 months, sometimes longer.
Is air layering better than cuttings?
Yes — significantly higher success rate and stronger plants.
Can I air layer any branch?
Best results come from healthy, pencil-thick to finger-thick branches in active growth.
Author
Trevor Wright is not just a seasoned horticulturist; he’s the esteemed Garden Doctor. With a BSc in Horticulture and years of hands-on experience in the soil, Trevor has become a trusted mentor for all things gardening. As the founder of Garden Doctor, he’s committed to clarifying the intricacies of gardening, offering straightforward advice that’s rooted in years of practice. His writing is a garden of how-tos, savvy insights, and comprehensive guides that enable individuals to nurture and grow their garden dreams. When he’s not knee-deep in garden beds, Trevor is at his keyboard passing on his green-thumbed wisdom to budding gardeners, ensuring that the legacy of sustainable and joyful gardening blossoms far and wide.


